Paisley students report
A Report prepared by Chris McGrory Chris Reid Allan Darroch Matthew Grant Niall Gibb Alex Thorburn
The Trial of Susan May
The 12th of March 1992 started out like any other day for Susan May. As she did every day she travelled to her Aunt Hilda Marchbank’s home at 24 Tandle Hill Road in Oldham to make sure she was out of bed and to take the elderly lady her lunch. She arrived at the house at approximately 9:30am only to discover Hilda lying dead on her bed in the downstairs bedroom. She had been savagely beaten about the head and face and the lower parts of her body were exposed. After the beating Hilda had been smothered using a pillow. It appeared as though a burglar had ransacked the house as drawers and cupboards had been tipped out. Susan, who was Hilda’s carer, informed police that two chequebooks may have been stolen but wasn’t sure what else, if anything, was missing. Police attempted to look for a burglar but after investigating several suspects without much success they turned closer to home. On the 30th of March 1992 Susan May was arrested in connection with her Aunt Hilda Marchbank’s murder.(1)
The “main plank" of the prosecution case was a number of stains found on a wall at the crime scene. A forensic scientist named Javaid Iqbal Hussain, a fingerprint expert, examined the stains using three different chemical reagents:
· Iodine spray
· Ninhydrin spray
· Tetra-amino biphenyl (2)
One of the stains, labelled JH1, contained Susan May’s fingerprint and another of the stains, MSN14, was Hilda Marchbank’s blood.
It was largely due to these stains that Susan May was convicted and it is the forensic techniques that were used to analyse them that we are going to be looking at in this report. We will be examining in depth the three techniques used, what they were used for, the results obtained from them and any possible limitations each technique has. We will also be looking at possible alternatives to these techniques that could have perhaps been used in this case.
Was the evidence used to convict Susan Hilda May accurate enough to ensure a safe conviction? By the end of this report we hope to have provided enough information to enable the reader to make up his or her own mind.
Highlighting Fingerprints and Presumptive Tests for Blood
Suspect stains left at a scene are usually an excellent source of evidence for the police. The normal procedure for stain investigation is as follows:
1. Visually examine the stain or substance. Ideally, the visual aspect of the bloodstain is sufficiently expressive to point toward certain conclusions. In the event of doubts, these may be resolved in subsequent stages.
2. Perform presumptive tests using chemical reagents. DNA typing can be performed on stains that have presumptively tested positive for the presence of blood and have a visual appearance of blood. Further serological examinations can be performed if sufficient material remains.
3. Perform confirmatory tests to determine if blood is present. Confirmatory tests are less sensitive than presumptive and species-origin tests. Therefore, it is possible to obtain a negative result for a confirmatory test in the presence of blood. Hence, a negative confirmatory test does not negate the presence of blood.
4. Employ a species-origin test, if sufficient material remains, to determine if a stain (which may or may not have tested positive for the confirmatory test) contains human protein.
5. Employ DNA analysis to determine the genotype and the gender of the bloodstain's donor (3)
In this case the enhancement of the fingerprint was the first priority and this was done firstly by the application of Iodine and then Ninhydrin to stain the print.
Iodine
Iodine reacts with greases and oils left on surfaces from fingerprints and is prepared as an iodine spray for use at a crime scene in the following manner:
Preparation of Working Solution
1. (Solution A) Dissolve 1 gram of Iodine in 1 Litre of Cyclohexane.
2. (Solution B) Dissolve 5 grams of a-Naphthoflavone in 40 ml of Methylene Chloride.
3. (Working Solution) Add 2 ml of solution B to 100 ml of Solution A. Using a magnetic stirrer, mix thoroughly for 5 minutes. Filter the solution through paper towels or filter paper into a beaker.
Procedure of Application
The solution should be lightly sprayed on the evidence using an aerosol spray unit. Lightly spray the item with several applications until latent prints sufficiently develop.
Complications
The Cyanoacrylate fuming process CANNOT be used prior to the Iodine process. It may be used, however, after the Iodine. On porous surfaces, DFO (1,8-Diazafluoren-9-one) and/or Ninhydrin may be used after the Iodine (4)
Ninhydrin
Ninhydrin is an amino acid developing reagent that is applied by dipping, brushing or spraying to obtain a Ruhemann's Purple dye complex. Ninhydrin may also be used as a blood enhancement technique. See reaction in Fig 1.1 below:
Fig 1.1
Procedure
Add about 2 mg of the sample to 1 ml of a solution of 0.2 g of Ninhydrin (1,2,3indanetrione monohydrate) in 50 ml of water. The test mixture is heated to boiling for 15-20 sec. This reaction is important not only because it is a qualitative test, but also because it is the source of the absorbing material that can be measured quantitatively by an automatic amino acid analyser. This colour reaction is also used to detect the presence and position of amino acids after paper chromatographic separation.
Positive Test
A blue to blue-violet colour is given by a-amino acids and constitutes a positive test. Other colours (yellow, orange, red) are indicative of a negative result.
Complications
Proline, hydroxyproline, and 2-, 3-, and 4-aminobenzoic acids fail to give a blue colour but produce a yellow colour instead. Ammonium salts (remember the house cleaner had washed some areas of the wall with bleach to remove stains) give a positive test. Some amines, such as aniline, yield orange to red colours, which is a negative test (5)
As amino acids from sweat or oils from the finger could have produced the positive Ninhydrin result, a further test was performed to confirm that the stain was in fact blood.
In this case, there was no need to carry out the Ninhydrin test after carrying out the iodine test since both reagents would give a similar result.
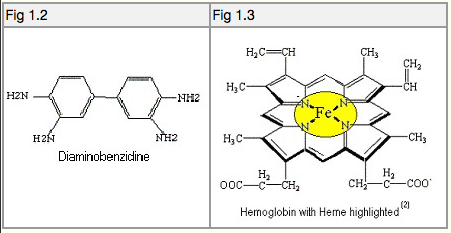
Tetra Aminobiphenyl
Tetra Aminobiphenyl (T.A.B.), also known as Diaminobenzidine (D.A.B.), see Fig 1.2, is a peroxidase reagent that is colourless, but becomes strongly visible when reacted with blood. It undergoes an oxidation reaction (catalysed by the heme groups in haemoglobin), see Fig 1.3, in the presence of hydrogen peroxide, which produces the dark brown colour reaction. Ninhydrin has no effect on the T.A.B. process (6)
Procedure
Preparation of Working Solution
1. (Solution A) 20g 5-Sulfosalicylic Acid dissolved in 1L distilled water
2. (Solution B) 100ml 1N phosphate buffer (Ph 7.4) mixed in 800ml distilled water
3. (Solution C) 1g DAB dissolved in 100ml distilled water
4. (Working Solution) 180ml Solution B 20ml Solution C add 1ml 30% Hydrogen peroxide
Procedure of Application
1. Solution A fixation 2-3 minutes, then water rinse.
2. Tray immersion of item into working solution for 3 to 4 minutes.
-- or --
3. Filter paper saturation of working solution for 3 minutes.
4. Distilled water rinse (7)
Positive Test
TAB is a peroxidase reagent that is colourless, but when reacted with blood it undergoes an oxidation reaction, which produces the dark brown colour indicating a positive result.
Complications
TAB is a protein stain that is not specific for blood. Dye will also absorb to palmar sweat, the sweat from a human being’s hand so when used to determine if a stain is blood there is a high percentage of false positive results. Other blood enhancement coloured protein stains may be used after TAB but cyanoacrylate fuming is detrimental to TAB processing. Distilled water must be used.
Alternative Reagents?
Other options could have been Tetra methylbenzidine (T.M.B.) or Leucomalachite green (L.M.G.), both of which are very sensitive and work in a similar manner to TAB. (oxidation reaction, catalysed by the heme groups in haemoglobin, in the presence of hydrogen peroxide) (8). The Kastle-Meyer Test is another possible technique, however, no matter which reagent was used, positive results are only presumptive of the presence of blood and further analysis should have been carried out, as in steps 3 - 5 of the process outlined above.
Kastle-Meyer
We are now going to look a bit closer at one of the possible alternative techniques, the Kastle-Meyer Test. The stains were tested using the Kastle-Meyer reagent at appeal stage and stain JH2 showed a poor result for blood whilst stain JH1 showed a negative result. Dr T Clayton of the Forensic Science Service (Prosecution) stated, "Both these findings could be due to the insitu fingerprint treatment they received. Similarly, it could be that the blood was 'old' thus explaining it’s loss of biological activity or (as in the case of JH1) that it was not blood at all." (12) So, what is the Kastle-Meyer Test?
The Kastle-Meyer test got a huge start from Louis-Jacques Thenard and Christian Freidrich Schonbein. Thenard discovered hydrogen peroxide in 1818, and Schonbein developed one of the first presumptive tests in 1863 (9). This test was based on the observation that the peroxidase-like activity in haemoglobin causes oxidation of hydrogen peroxide. The result of the reaction between hydrogen peroxide and haemoglobin is the appearance of “foaming" as the oxygen bubbles rise. Shonbein reasoned that if an unknown stain foamed when hydrogen peroxide was applied to it, then that stain probably contained haemoglobin, and therefore was likely to be blood. In the early 1900’s, Dr. Kastle developed a presumptive test for haemoglobin, which used phenolphthalein as a colour indicator. A few years later, Dr. Meyer refined and improved upon this test, and this is why it is known as the Kastle-Meyer test.
Procedure
There are three reagents used as part of the Kastle-Meyer Test and they are:
1. Alcohol: Methyl or Ethyl alcohol is used to increase the sensitivity of the test. It does this by “cleaning up" the area in and around the bloodstain to better expose the haemoglobin.
2. Phenolphthalein: This is a solution that acts as a colour indicator. When prepared, the solution is boiled for several hours to help remove most of the oxygen trapped in it. It should appear as a colourless liquid. When this solution is oxidized (exposed to oxygen), it will turn pink
3. Hydrogen Peroxide: This is the 3% form typically found in chemists. Hydrogen peroxide is essentially water with an extra oxygen atom attached to it and is a chemical oxidant.
Before testing the suspect stain you should perform a test with a positive control, this can be a small swatch of cloth that is stained with dried, non-human blood. (Animal blood is used to stain the control in order to prevent the possible transmission of diseases.) A drop or two of de-ionised (D.I.) water is applied to the swab to moisten it, and then the swab is rubbed lightly against the control. Once this is done, begin applying the reagents in the following manner:
1. Alcohol: Apply a drop or two onto your swab.
2. KM: Apply a drop or two onto the swab.
At this point you should pause for a few seconds and look for any sign that the swab is beginning to develop a pink colour. This is not expected to occur when using your control, but if it is, you are seeing a false-positive reaction and should not continue further as something is interfering with the test. If no colour is seen developing, proceed with the last step, which is:
3. Hydrogen peroxide: Apply a drop or two onto the swab. You should see a pink colour develop almost immediately.
The control need only be performed once before beginning a series of tests. Thereafter, repeat the same procedure throughout testing of suspect stains (10)
How Does Kastle-Meyer Work?
Fig 1.4 below helps illustrate what happens in the KM test.
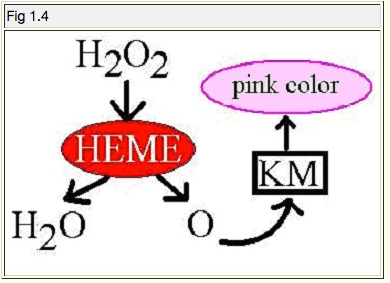
1. Hydrogen peroxide: Elemental oxygen typically comes as a pair of molecules, as it does in the peroxide, but the Heme from the suspect stain in our test breaks it up.
2. Heme: This is where we find peroxidase-like activity. This is what breaks up peroxides. Peroxides are toxic to animal tissue, and are decomposed by the heme in blood. In this case, hydrogen peroxide is decomposed into two parts: water, and free oxygen radical.
3. The free oxygen radical is going to combine with the KM, our phenolphthalein colour-indicator. This is because when the KM solution is initially prepared, it is boiled in a flask for several hours to help remove oxygen. (A little bit of zinc metal dust added to the solution helps to bind oxygen as well.) When the solution turns colourless, that means the KM has had most of its oxygen removed, and is now "oxygen hungry". So the KM is badly in need of oxygen, and there's a lonely oxygen radical floating around looking for something to bind to.
4. Pink colour: This is the blushing that occurs when the oxygen radical bonds with the KM reagent. The radical oxidizes the KM, and this oxidation causes the KM to turn pink (11)
Analysing the Results
You have used the KM test and have obtained results, but what do they mean? Table 1.0
Below is a guide to interpreting the results of the KM test (10)
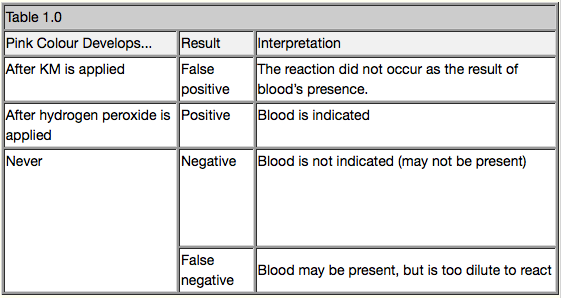
Like the actual reagents used in the Susan May case, the Kastle-Meyer test is only a presumptive test for the presence of blood. If a positive result is obtained then further confirmatory tests should be applied to the stain in order to determine if the stain is actually blood or some other substance that may also give a presumptive positive result.
Conclusions
In the Susan May case three presumptive tests were carried out, Iodine Spray, Ninhydrin Spray and the TAB test. All three gave a presumptive positive for the presence of blood. Does this mean that the stains were DEFINITELY blood? The answer to that question is no it doesn’t. Forensic scientists use presumptive tests as an easy way to eliminate possibilities. This avoids unnecessary testing of for example, powders for drugs or blood for blood group substances or DNA profiling.
A positive presumptive test is not regarded as reliable proof that the substance is what it has been tested for. This is particularly important when used in the legal domain where presumption is “an inference of the truth of a fact from other facts proved". This is NOT the scientific use of the word.
Therefore, no matter what presumptive test was used, it would normally be regarded as a preliminary test before further testing to identify the material. For blood, these further tests would include the identification of the source of the blood by blood grouping or DNA profiling. The least informative data is that it is blood, the next the species, blood group, and DNA profile in increasing order of discriminatory power in establishing a source.
In this case the TAB technique was used, ostensibly to identify the material as blood. TAB is a ‘nuclear stain’ used in histochemistry to stain the nucleus of cells. The relevance of this is that almost every cell in every plant or animal has a nucleus. Almost any biological material, including blood, would show positive by this method. This would not normally be a major problem for investigators when it is used as a preliminary test or just to show fingerprints, they would expect to do more tests to establish the material as blood. However, it cannot be regarded as specific for blood and therefore it has not been established by this test that the marks in this case were blood.
Now to the KM tests that were performed at appeal stage, not only did they give poor results (or negative in the case of stain JH1!) but also they were not performed at the time of the investigation and could not therefore have been followed up on.
As we have shown above, there is very little hard forensic evidence linking Susan May to the murder of her aunt, yet she still languishes in prison to this day. Was she guilty or innocent? Perhaps we will never know for sure but in the humble opinion of the authors of this report she deserves at least another trial. What do you think?
Bibliography
1. Taken from Case Overview on http://www.susanmay.co.uk
2. Taken from Evidence of Javaid Iqbal Hussain on http://www.susanmay.co.uk
3. Taken from Forensic Science Communications, July 1999 Volume 1 Number 2. Critical Revision of Presumptive Tests for Bloodstains - Ana Castelló Ponce and Fernando A. Verdú Pascual, Department of Legal Medicine, College of Medicine and Odontology, University of Valencia, Valencia, Spain.
4. Taken from http://www.forensictc.50megs.com/Iodinepsray.htm
6. Taken from http://www.cbdiai.org
7. Taken from http://www.cbdiai.org/Reagents/dab.html
8. Taken from http://www.chemed.chem.purdue.edu
9. Taken from http://www.forensicdna.com/Timeline.htm
10. Taken from http://www.geocities.com/a4n6degener8/kastle.htm
11. Taken from http://www.geocities.com/a4n6degener8/km_workings.htm
12. Taken from http://www.susanmay.co.uk/pros_trial_sci.htm